Wiki
Clone wikiFAQ / Aeros Apollo
FAQ Navigator
- Aeros :: Common FAQ
- Aeros :: Aeros Avatars FAQ
- Aeros :: Aeros Avatars Appliers and Extras FAQ
- Aeros :: Aeros Male Attachments FAQ
- Aeros :: Aeros Apollo
current page - Aeros :: Aeros News
WARNING Text in this wiki may contain adult-only terms and expressions. Video links are properly marked as adult-only as well.
- FAQ Navigator
- Aeros Apollo
- Aeros Apollo Help Plates
- Help Buttons
- Help Button Pages
- Help Toolip: Zoom, Wiki, Close
- Orange Arrow
- Hide / Show
- Foreskin Control
- Minimize/Maximize
- Side-To-Side Tilt Control
- Condom
- Settings, Proportions Tab
- Settings, Color & Texture Tab
- Settings, Misc. Settings Tab
- Animation Sequencer Window
- Light HUD
- Blue Menu - Target... / Allowed... / Invite...
- Difference with the [6.x] Remote HUD
- If you want others to send commands to your Apollo, don't detach your HUD
- Allow Several
- Target Several
- Regular HUD vs Light HUD
- Don't forget to allow
- Silent ignoring when no permission
- Level of control
- Quick disallow
- Prevention of the notification flood
- Items worn by you automatically have full control
- Re-issue commands that hit the disallowed wall
- [ Allowed... ] is always for the owner
- Use blue dialogs and hide them
- Balls Resize
- Adjust Position
- Show - Grow
- Browsers
- Injection HUD
- Disintegrator
- Developer Kits
Aeros Apollo
In memory of Erasmus Weatherwax.
Ras (erasmus.weatherwax): "Aeros is best and I've owned them all...I should put up a peni shrine someplace"
Aeros Apollo Bento: Pros & Cons
Apollo is fitted mesh rigged to bento skeleton.
Current Version: [7c Beta] - July 13th, 2020.
TRY DEMO FIRST
This model is potentially incompatible with your avatar and/or your AO (Animation Overrider).

Pros
- Circumcised / Uncircumcised combined into one model.
- More foreskin stages (5 stages implemented activated by 3 different buttons).
- Smooth change between the angles, stages of hardness.
- More realistic throbbing - slider controls the level quite nicely.
- Ability to make the shaft shorter / longer and define behavior of how fast it grows between flaccid and hard (show-grow).
- Keyframe hidden editor ("Disintegrator") built-in to create your own look for every orange arrow angle. (skull and crossbones icon).
- Tattoo layer:
- A few built-in tattoos.
- Any tattoo via Injection HUD
- Shaft & Balls are seamless.
- Texture browser reworked to allow for a wider range of available textures seen at one given time.
- Normal & Specular Maps selection included for improved reflection of light. The Injection HUD can be used for full customization.
- Shaking & Bouncing animations included.
- Easier way to edit almost any property of any layer via Injection HUD.
- Alpha Cut (2 areas to hide).
- Attach nearly anything to the knob! (Add to Right Hind Foot)
Cons
- No ability to arbitrarily resize the knob / balls (balls can only be moved up/down)
- No Overall / Mega Size. Instead Rigged "Size 1", "Size 2", "Size 3" & "Size 4" are included - TRY DEMO FIRST!. MORE SIZES ARE PLANNED
- Some avatars may find it impossible to use Apollo because of the hind bones misplaced and animated - TRY DEMO FIRST!.
- Female shape doesn't have a slider that is used to resize the balls - TRY DEMO FIRST!.
- The rest of Acknowledged Bugs / Missing Features.
- There is no way to kill scripts, because the shape is depending on the continuous animation playback. Since [7c Beta] there is a Light HUD available that reduces overall script count. The HUD can be also completely detached.
Fixed / Improved
[7d Beta] [WORK IN PROGRESS]
- [Fix] API-enabled furniture making Apollo visible instead of affecting it only if it has been made visible manually.
[7c Beta] Update - July 13th, 2020
- [FEATURE] Include a few built-in tattoos and create a corresponding UI.
- [FEATURE] Allow for updated Color Match HUD requests to communicate with Apollo to apply calculated texture & tinting combinations based on the destination color (versus the tinting color approach in the regular HUD).
- [FEATURE] Light HUD - a version of the HUD that runs on half the scripts by removing the most of the Settings functionality. Settings like keyframes and prim positions can be imported when both HUDs are worn. The regular HUD auto-detaches after import completion.
- [FEATURE] Remote control addressing scenarios like "one person controlling several cocks" and "several people controlling one cock". Works with free Light HUD as well as the regular HUD (if Apollo is owned). Version numbers should be matching.
- [IMPROVEMENT] Add some more subtle and smooth animations, like moving, bouncing, twitching. Static animations are now on the second page (use ">>" button in the browser).
- [IMPROVEMENT] Add a special "pause" animation, to make it possible to create a blank moment inside the animation sequencer.
- [IMPROVEMENT] Disintegrator is given more memory to accommodate a few additional key frames.
- [FIXED] Aeros API is not fully functional.
- [FIXED] HUD's Color & Texture tab not showing the tinting color correctly.
- [FIXED] Unnecessary hiding of alpha cut & bending controls when the Flow mini-window is shown.
- [FIXED] Ejaculate inside the condom looks unnaturally creamy.
- [FIXED] Bending animations don't restore upon relog or rewear.
- [FIXED] Pre-changing of the orange arrow while the cock is hidden does not apply correctly immediately when showing the cock back.
- [FIXED] Auto-hide upon entering PG regions is broken.
- [FIXED PARTIALLY] Animations look choppy. The fixed ones have a lighter background in the browser.
NOTE for the owners of the Balls Hair Addon: Please visit the store and manually request the updated version through any of the redelivery terminals. This product doesn't have the auto-updating functionality in attempt to reduce the amount of scripts. Old versions will not respond to the updated [7c Beta] HUD.
[7b Beta] Update - December 25th, 2019
- Proportional look between sizes without tweaking shaft length and bones positions.
- Default Specular & Normal Maps.
- Selection between several built-in Specular & Normal Maps from the HUD. Disable if desired.
- Anim window to start shaking and bouncing animations. Sequences up to four animations. Three speeds for each dynamic animation.
- Bouncing and shaking animations that obey vertical & horizontal angles while played. (Pictured with red arrows)
- Bouncing and shaking animations that don't allow to change vertical & horizontal angles (predefined look). (Pictured with black arrows)
- 1-frame animations (poses) for taking pictures or resting poses.
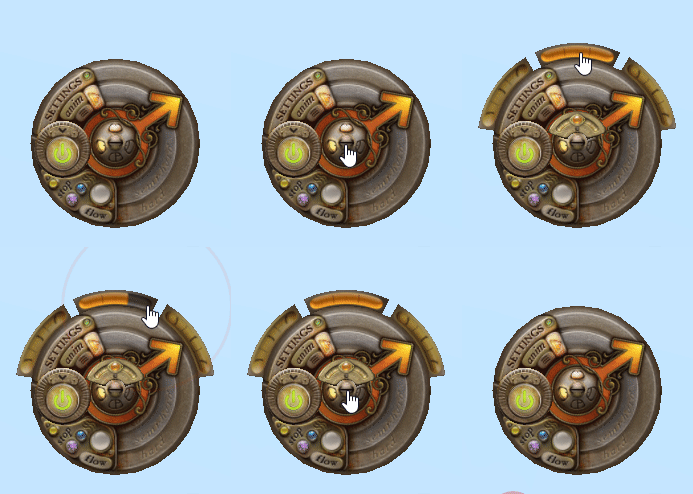
- Side-to-side tilt popup now contains six bending poses that also obey vertical & horizontal angles. Disables when the popup gets hidden.
- Side-to-side tilt popup now contains alpha-cut to hide 2 sections of Apollo. Disables when the popup gets hidden.
- Condom texture improved.
- Condom liquid now shows during ejaculation and builds up during subsequent ejaculations.
- (?) Button from the Main HUD face will auto-hide if kept clicking after two rounds of all help window popups.
- (?) Buttons around the HUD now lead to correct wiki pages.
- Disintegrator keeps gauges intact when: shaft length or show-grow is tested / foreskin mode is flipped / horizontal angle changed (helps with testing before saving a keyframe).
- Disintegrator now prevents adding too many keyframes that would otherwise lead to script crash.
- Injection HUD improved:
- Individual slots now have their menus with additional comments and commands.
- Modify legacy bumpiness & shininess. Or bypass them.
- Correctly override Main HUD settings.
- Reset to factory default in Apollo slots.
- Fixed flickering of the head through the foreskin in Size 4, hard stage, auto-foreskin.
Balls Hair Addon now available - August 28th, 2019 - from the store, next to Apollo
[7a Beta] Fixes - July 6th, 2019 (silent repacking)
- Pubic hair - added silently to the [7a Beta] boxes on July 6th, 2019. Pubic hair is an additional attachment, unrigged and modifiable. This makes it flexible for all kinds of shapes. You can move it with regular right click Edit. Of course it hides and shows with the cock. Also obeys to HUD's hair texture / color / size / adjust sliders. But does not break what could be changed by the owner: prims positions, rotations, alphas etc. Only changes texture / color if it is different from the previously applied values. Feel free to create copies, detach the pieces and reattach to make it looking thicker. Remove the scripts in case you want to keep the hair untouched. All built-in (but one) textures are white, so hair can be made of any color when tinted.
[7a Beta] Fixes - June 19th, 2019
- Some AO (Animation Overriders) run animations that affect the bones that they should not affect. This is now fixed with the Priority 5 animations re-uploaded that are controlling the shape of the cock.
- Another Size has been added (Size 4).
- Moving the parts down & backwards enhanced.
- All the invisible prims now are completely hidden when the cock is turned OFF - except one (will come back to it later).
- Developer Texture Maps Uploaded.
Aeros Apollo Acknowledged Bugs / Missing Features
Major Issues:
- Female shape does not have the 'Package' slider. Resizing of the balls needs another approach.
- Smoother texture set with less veins is missing.
Under active development - Ridged texture set with more pronounced veins is missing.
Under active development - Needs even more animations to adjust positioning deeper / lower in the body. Has been enhanced in [7a Beta]
Under active development - Settings Save / Restore feature has been broken.
- Particles are not shown correctly when requested from the balls and shaft area.
- Effects layer mentioned in Injection HUD, but not implemented yet. Reason: Fine-tune of the mesh rigging is required to make it perfectly placed between the tattoo and liquid.
- No provisions for a smooth blend between the cock and the body made yet - considering
BOM-enabled system. - Only 4 sizes available. We need more! Ex: Between #1 & #2. #5 etc.
- Some sizes are slightly off-centered.
Physics Related:
- [FIXME] Physics is implemented but is unreliable and animates other body parts too.
- e.g. Belleza has the butt animated with the Apollo
- [FIXME] Physics affecting the shaft is missing.
Would be Cool Related:
- [TODO] More horizontal angles. Possibly without vertical angle high precision. Has been improved in [7b Beta] with bending 1-frame poses.
- [TODO] Other options for shaft / balls / head shapes.
- [TODO] Animesh version - (a simplified version to accommodate animesh limitations).
- [TODO] Improve Main Textures.
- [CONSIDER] Less veiny when flaccid variation of skin.
Main HUD Related:
- [TODO] Choose to auto-hide on PG, Adult, Mature region change.
- [TODO] Specular params (Glossiness / Environment / Color) easier way to tweak without Injection HUD.
Disintegrator Related:
- [TODO] Several keyframe built-in settings and ability so save / restore them. Let user save their custom keyframe data. Shifts should be restored from there too.
- [TODO] Disintegrator should let saving adjustments to positions as keyframes for complete customization.
- [FIXME] Spelling of Disintegrator label in the HUD.
Injection HUD Related:
- [TODO] Injection HUD morphing into appliers. Keeping track of original texture owners.
- [TODO] Additional behavior when layers with alpha channel are covered with other layers with alpha channel.
Animations Related:
- [TODO] More animations including all body movements and hands motion.
Misc:
- [TODO] Add condom liquid smoothly fill it completely.
- [TODO] Addons:
- Cum Stages
- Cock Rings
- Piercings (Prince Albert, Dydoe, Guiches, etc...)
- Strap-on
- [TODO] More explanation as to how to use the Injection HUD.
- [TODO] Remote control permissions.
Minor
- [FIXME] Floating invisible prim while hidden. There is 1 left as of [7c Beta]
- [CONSIDER] Animesh version (a simplified version to accommodate animesh limitations).
Rejected
- [REJECTED] [FEATURE] Extend Target... menu (introduced in [7c Beta]) to include individual prim UUIDs to address a use case of "two HUDs controlling two cocks worn by one avatar". - Not possible to implement, since animations only affect one skeleton per avatar.
Aeros Apollo Help Plates
As they appear when help button's wiki icon is clicked as well as from the blue menus. Scroll down to read them over.
[00]
Help Buttons
Click any of the Question Mark Help buttons spread around the HUD to see a quick help on a particular or the most tricky feature. Each Help Button allows to jump to a wiki page that provides more details.
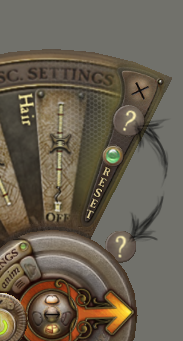
This is a work in progress feature. Expect more pictures and video links added eventually.
- Quick Links To:
[01]
Help Button Pages
Keep clicking Help button for more pages.
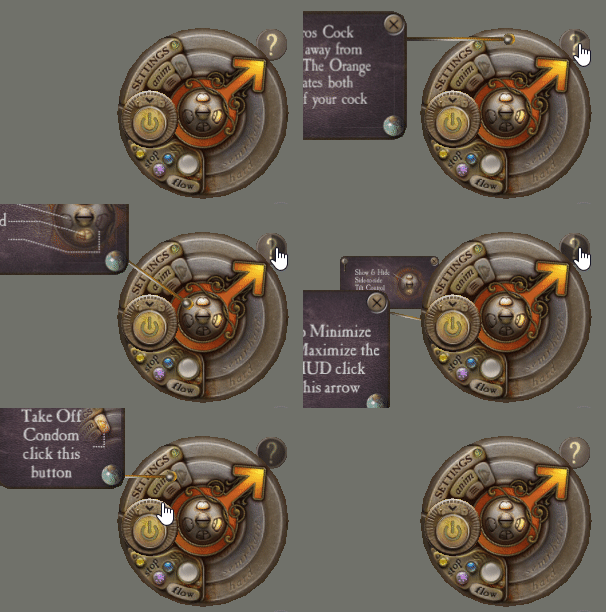
- Quick Links To:
[02]
Help Toolip: Zoom, Wiki, Close
Help magnifier icon to enlarge help tooltip. Click Wiki button to navigate to corresponding wiki page for more details. Click Close to close the tooltip.
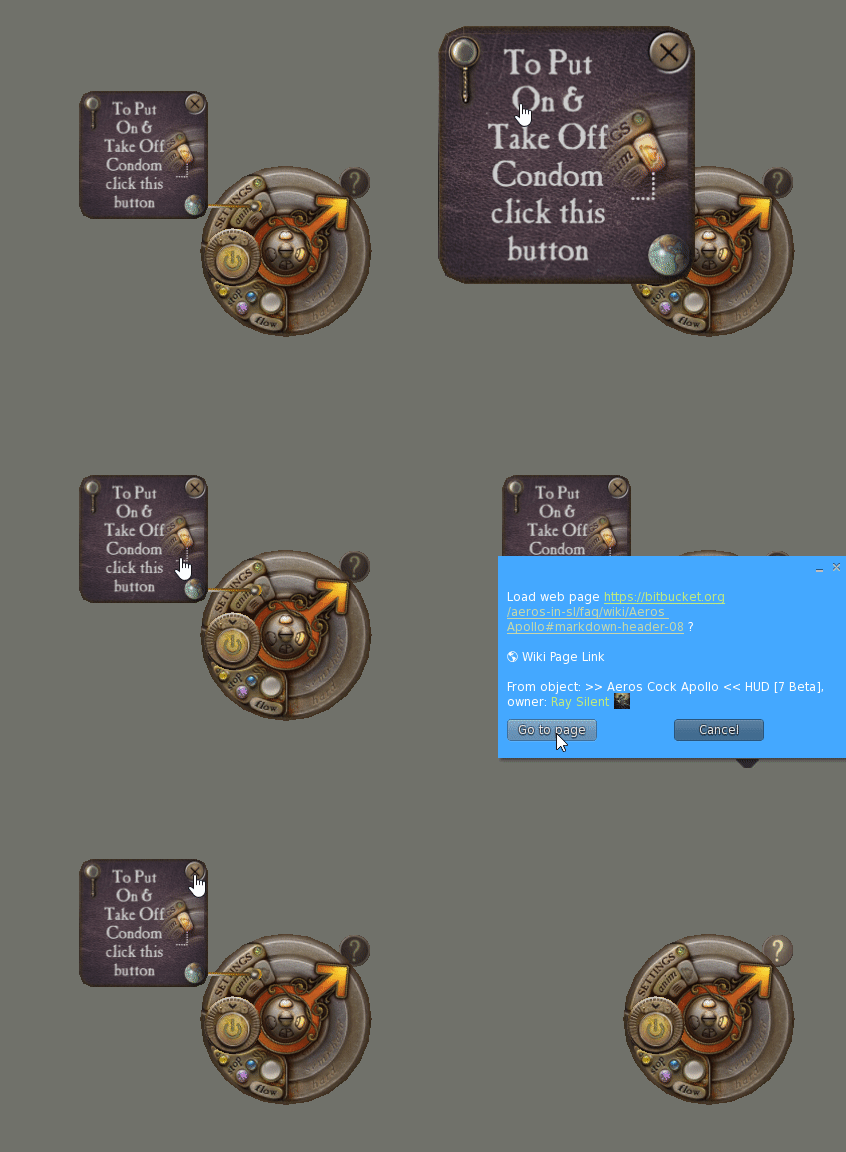
- Quick Links To:
[03]
Orange Arrow
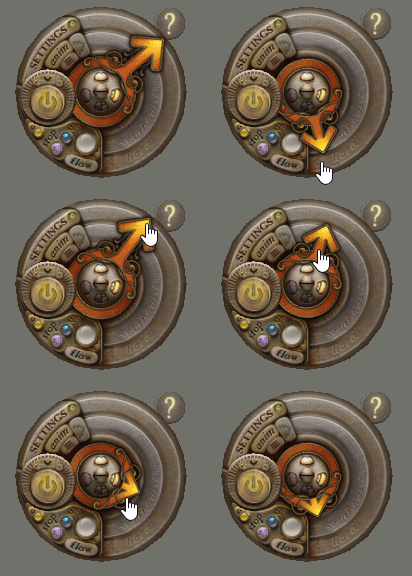
Click anywhere within the semicircle area in order to specify the vertical angle of your Aeros Cock. When clicking farther from the middle of the area, the cock gets harder.
- Quick Links To:
[04]
Hide / Show
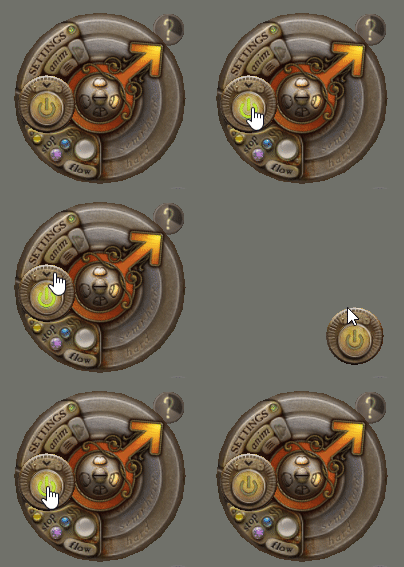
Click the ON/OFF button in order to quickly Hide & Show your Apollo.
- Quick Links To:
[05]
Foreskin Control
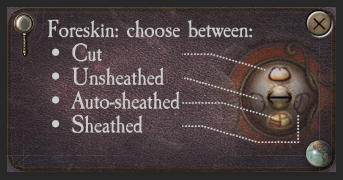
These four buttons, placed around the center within the orange arrow's ring, are designed to switch quickly between desired foreskin modes. Four are available in Apollo:
- Cut (Circumcised) - No foreskin in this mode. A special texture is used.
- Unsheathed (Uncircumcised - Pulled Back) - Uncut mode where foreskin is pulled all the way back.
- Auto-sheathed (Uncircumcised - Auto) - Never fully pulled back or pulled forward, moves the foreskin depending on the shaft hardness.
- Sheathed (Uncircumcised - Pulled Forward) - Maximum cover of the knob - except when the cock is hard where we pull it back a little.
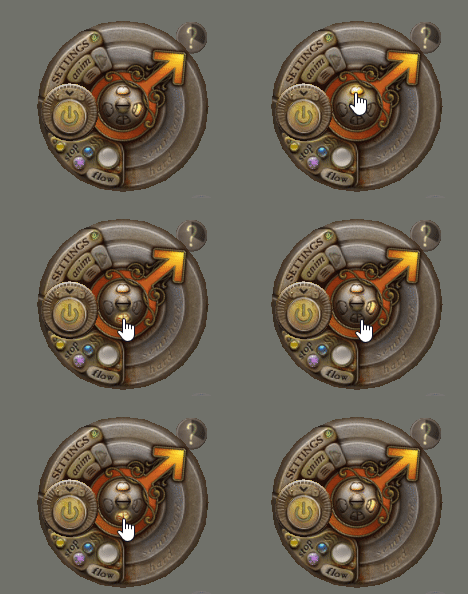
We use 3 different textures when rendering foreskin modes. Main HUD doesn't go into these details. But when you use Injection HUD, you will notice three sections:
- Skin Cut
- Skin Uncut - Pulled back (Only used for Uncircumcised - Pulled Back case)
- Skin Uncut - Pulled forward (Used everywhere else for Uncircumcised)
- Quick Links To:
[06]
Minimize/Maximize
Little arrow above the ON/OFF button is for minimizing and maximizing the HUD. We also automatically move minimized version to the corner, so it's not on the way. Which corner the HUD moves to depends on its attachment point.
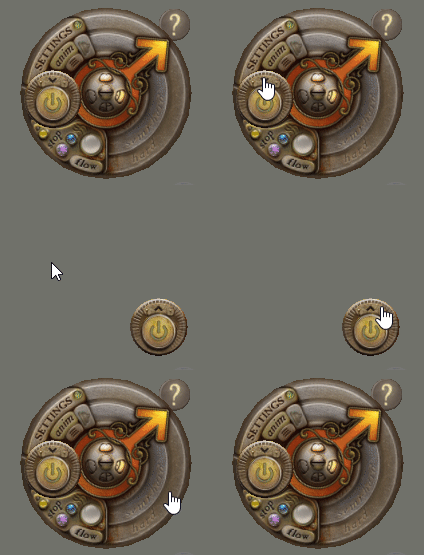
- Quick Links To:
[07]
Side-To-Side Tilt Control
Side-to-side Tilt Control is activated by clicking (<->) button right in the middle of the HUD and orange arrow. This opens up a little popup window with a slider to move the cock left-right.
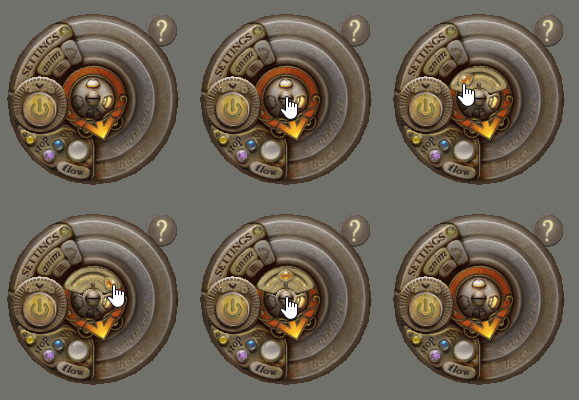
Since version [7a Beta] this button also activates alpha-cut control to hide 2 sections of Apollo:
- Quick Links To:
[08]
Condom
To put on & take off Condom click this button. To adjust the way condom looks, use Injection HUD.
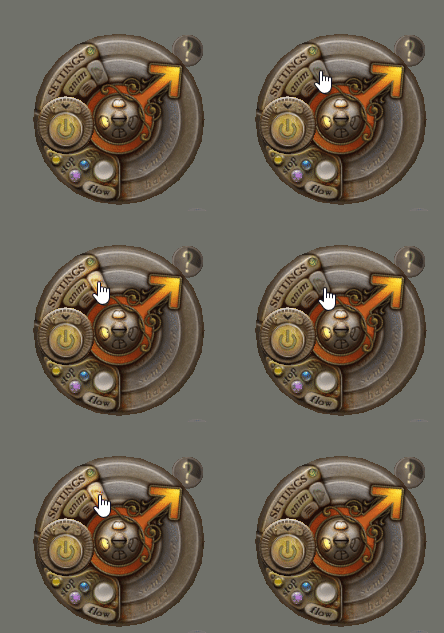
You can also adjust Liquid that shows under Condom during ejaculation. Default Liquid will stop animating only if you change Liquid's Diffuse texture. Everything else will be merged with the built-in behavior. Be careful with the Alpha Mode. By default it is set to Alpha Masking. It is a good idea to keep Alpha Masking bypassed.
- Quick Links To:
[08a]
Settings, Proportions Tab
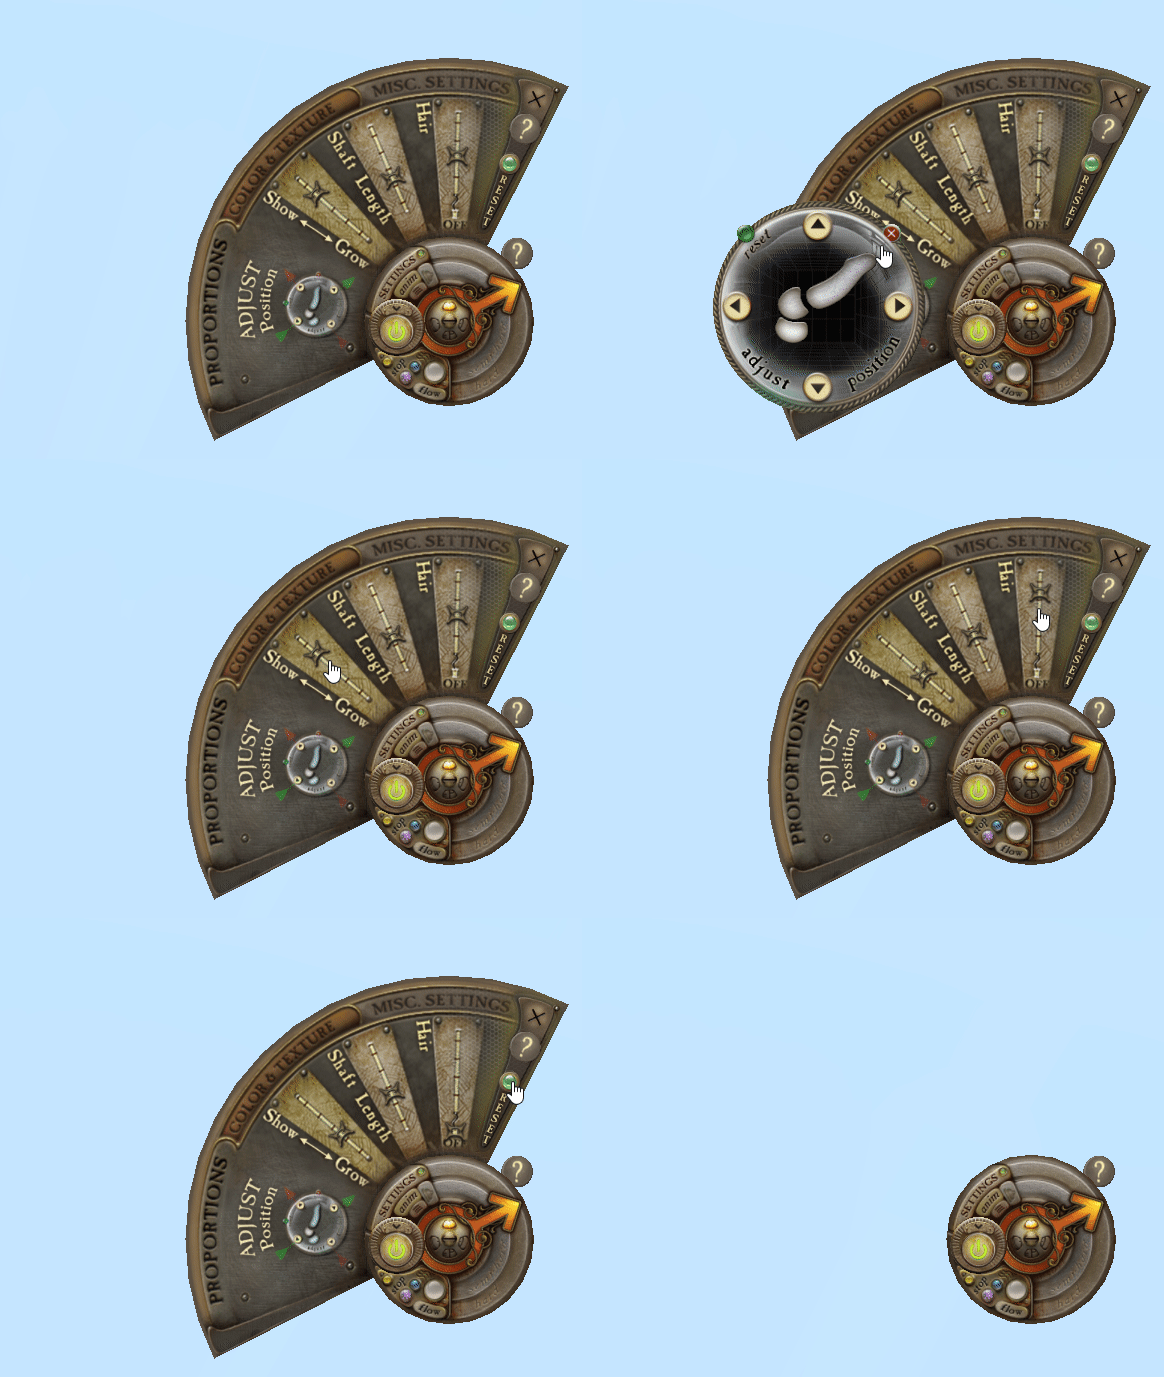
Balls Resize
Although not present in the HUD, please navigate to Balls Resize for more information.
Adjust Position
Click Adjust Position icon to popup mini-window to control Apollo's position on the body. To learn more, navigate to Adjust Position section.
Show / Grow
To adjust behavior of the length, use this slider. Read more at the Show / Grow section.
Shaft Length
To adjust shaft length use this slider.
Hair
Please attach Hair prim (included in the box) to be able to resize hair. Use "OFF" position to hide it. Hair prim comes with Modify rights so you can enlarge it further and even edit textures if desired.
- Quick Links To:
[08b]
Settings, Color & Texture Tab
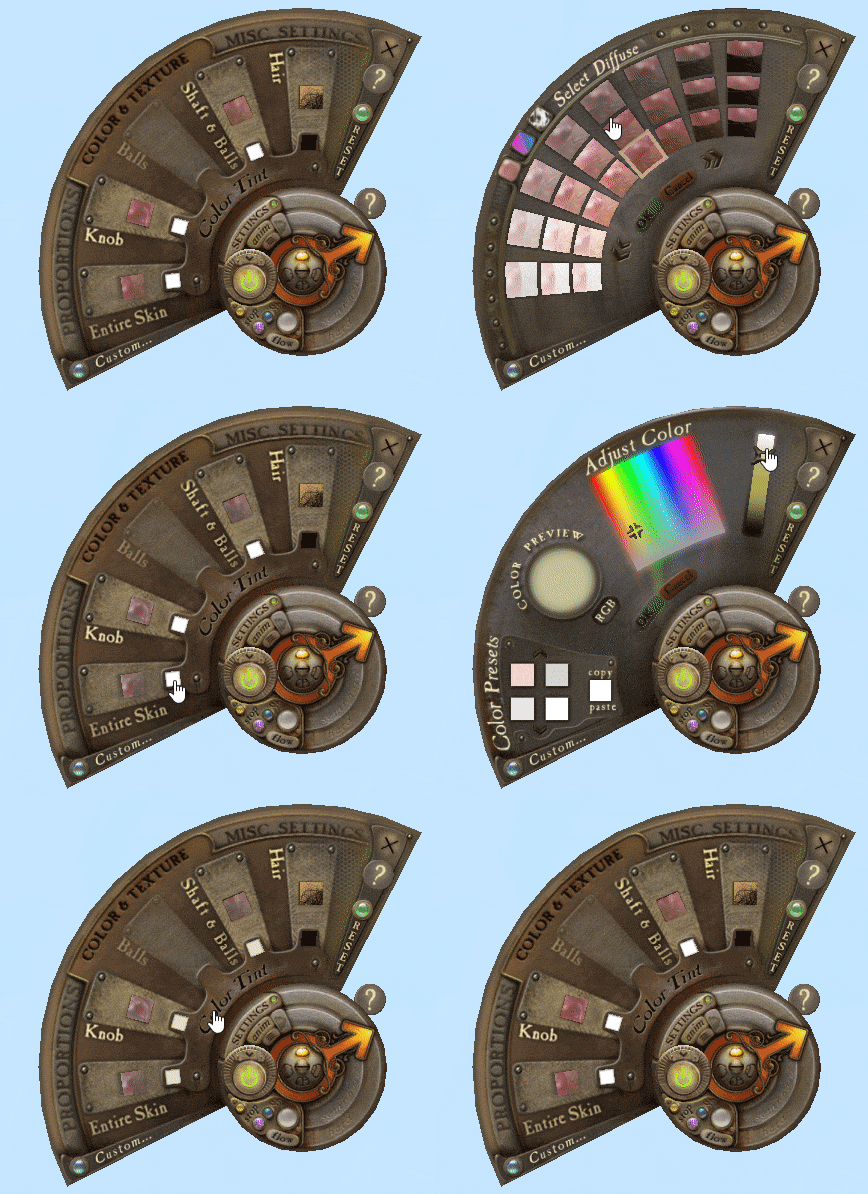
Entire Skin
Use this section to select texture and tinting color for both shaft & balls simultaneously. Texture Browser will popup. Please navigate to Adjust Texture / Tinting Color for more specific information.
Knob, Shaft & Balls, Hair
These section let you select texture and tinting color for individual elements.
- Quick Links To:
[08c]
Settings, Misc. Settings Tab
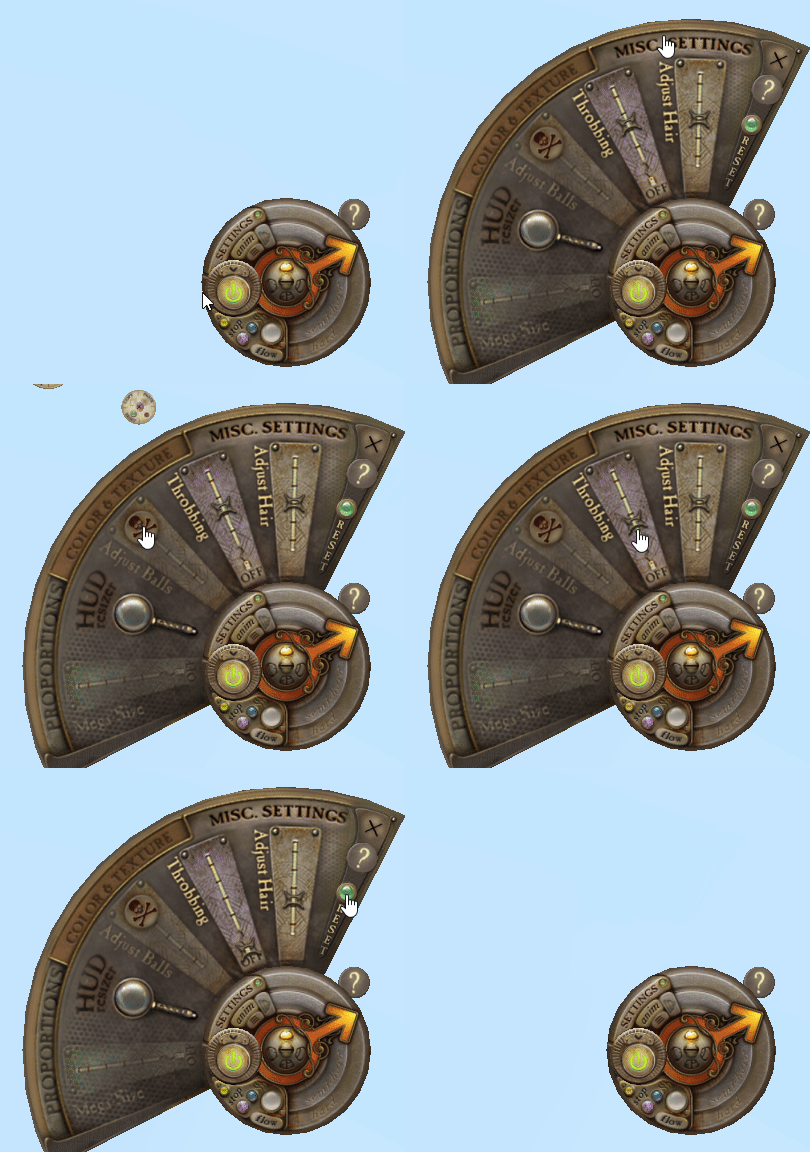
HUD Resizer
This popups HUD Resizer mini-window to enlarge or make the HUD smaller.
Disintegrator (skull and crossbones icon)
If you found this, use it at your own risk. For more information, navigate to Disintegrator section.
Throbbing
Control level of throbbing or completely disable it.
Adjust Hair
Wear included in the box hair prim and use this slider to move hair forward-backwards. Keep in mind that hair is not rigged, so you can as well simply move it by right click > Edit either at the prim itself or its name (marked as worn) in Inventory. Hair is also comes with mod rights, so you can adjust prims freely.
- Quick Links To:
[08d]
Animation Sequencer Window
(Available since [7b Beta] update)
 Animation Sequencer Window Video
Animation Sequencer Window is accessed by clicking "anim" button right below "SETTINGS" button.
Play
Begins selected sequence of up to four animations. They will be played one by one and looped with a random 5-8 seconds delay. The one that is currently being played will be lit up.
Stop
Stop button stops the sequence.
Modify Sequence
To select another animation, click circle with the animation icon and choose in the browser that pops up. Click OK to confirm or Cancel to revert changes.
To add another animation to the sequence click "(+) add".
As soon as you have more than one animation, you might need to move "selector" that lets you change speed and delete animation from the sequence. To move "selector", click any other circle with animation icon.
To select another speed for the animations, click one of the 3 bars above "speed" label.
To erase animation from the sequence on which selector is placed, click (X) at the top of "selector".
To force to play animation on which "selector" is placed, click the cog below "speed" label.
To add a blank moment within the sequence, add a "pause" animation.
Types of Animations
Animations differ from each other as following:
- Those with red arrow represent animations that let you change vertical & horizontal angles. They come in 3 speeds.
- Those with black arrow represent animations that don't allow you to change vertical & horizontal angles, and they will look similar every time. They come in 3 speeds.
-
Those with the film background are 1-frame poses. Since [7c Beta] they are located on the 2nd page. Use ">>" and "<<" to browse beyond the first page. Static animations have no speed variations. They are intended for taking pictures or resting poses. Although they only consist of 1 frame, technically they are animations.
Please keep in mind that several 1-frame poses that represent special bending (adjustable with the vertical & horizontal angles) are located under horizontal angle popup (activated by
(<->)button in the middle of the HUD). They are placed there due to their main role - to modify the way Apollo looks side-to-side. They cannot be played simultaneously with the animation sequencer, so you may notice strange flipping between animations if both are turned on and the sequence keeps playing.
- Quick Links To:
[08e]
Light HUD
(Feature since [7c Beta])
The [Light HUD] is a stripped version of the regular HUD. It runs on half the scripts by sacrificing most of the settings user interface. This version is perfect for regions requiring less scripts. It's suggested to use it whenever possible after finishing all the configuration. In order to get it, please click the menu button, located at the front HUD's face right below "anim" and choose [Get Light HUD]. The [Light HUD] can also be sent to another avatar via [Invite...] button to let other avatar send commands to your Apollo. Several can be worn this way without sacrificing much of the region memory, when they are targeting different avatars.
Settings Transfer
If you own Apollo and you want to use [Light HUD], and keep all your settings, do the following:
- Request your Light HUD using menu, [Get Light HUD].
- Find it under your Objects in Inventory.
- Move it to some meaningful folder.
- Attach it (right click > Add) while the regular HUD is still worn, so all the settings are automatically imported. As soon as the synchronization is complete, the regular HUD will be auto-detached. Since the HUDs can target other avatars (using HUD's menu [Target...]), this synchronization will only happen when both HUDs are targeting you (which is a default setting). For more details regarding [Target...] and [Allowed...] please jump to the corresponding section.
Light HUD has no settings functionality, and a warning will be shown if the attempt to reach the [Settings] is performed:
■ This is a [Light HUD] where [Settings] are taken out to reduce the amount of scripts. (It is also commonly sent as a free HUD for remote control).
■ If you own regular HUD, please detach [Light HUD], put on the regular HUD and edit the settings.

■ To import settings from the regular HUD, attach both HUDs (using right click > Add). The regular HUD will auto-detach upon completion.
Adjustments of Settings
As a consequence of what is described above, if you need to adjust any settings, including keyframe data, and you are using the [Light HUD], first detach the [Light HUD], because wearing the regular HUD will automatically initiate auto-importing and will result in auto-detaching of the regular HUD.
Light HUD will popup the [Resizing Window] every time it is worn, which includes relogging. This is simply because the ordinary way of reaching this window is inaccessible.
- Quick Links To:
[08f]
Blue Menu - Target... / Allowed... / Invite...
(Feature since [7c Beta])
There is a Target / Allowed / Invite menu that can be accessed using the three-lines button right below "anim" on the main HUD's face of the regular HUD.
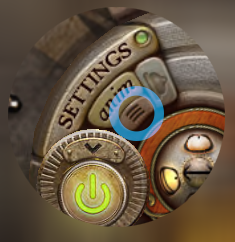
When clicked, a regular blue menu will appear, designed to edit:
- [Target...] - who is targeted by this HUD to be able to send commands to their cock (with appropriate permission from them using their [Allowed...] menu).
- [Allowed...] - who and what is able to send commands to your cock by both avatars and devices.
- [Get Light HUD] - receive the [Light HUD] for your own usage - either for minimizing script impact or to wear an additional HUD to send commands to the other avatars. (This button is absent in the [Light HUD]'s dialog).
- [Invite...] - send a nearby avatar the link to receive their free [Light HUD] for remote control purposes. (This menu is absent in the [Light HUD]'s menu).
[Light HUD] is described in detail here.
Difference with the [6.x] Remote HUD
The process of receiving the HUD is different from the way it works in [6.x] models, first of all because we removed the ability to click the cock and request a [Remote HUD] (which became almost necessary, since rigged items are hard to click, prompting for workarounds like having an ugly large enough non-rigged prim within the link set, which becomes visible when Ctrl-Alt-T is enabled).
But most importantly, the dialog and communication between the HUDs and Apollo has been completely reworked to address scenarios like "several avatars/devices controlling my cock at once" and "several HUDs worn by me to control different avatars".
There is no designated "Remote HUD" in Apollo per se. Both regular and [Light HUD] are capable for controlling any other avatar's Apollo with the only one difference: [Light HUD] has no settings functionality, which should be enough for the most cases.
If you want others to send commands to your Apollo, don't detach your HUD
The HUD in this Bento model keeps a lot of data, most importantly, the keyframe database, controlling the way Apollo curves in different angles, which can be modified for personal taste using Disintegrator. So if you notice that everything works remotely except that the angles are not reacting, that's because the owner of the cock still needs to wear their HUD (which can be a [Light HUD] perfectly fine), with the [Target...] set to [Target Me] (which is a default setting).
Allow Several
You can allow up to six avatars and/or devices to pass commands to your cock simultaneously, by editing what's in the six slots under [ Allowed...] submenu. All the commands accepted will be synchronized between all the rest avatar's HUDs in that list, to keep the HUDs up-to-date.
NOTE: The avatars wearing allowed HUDs have to be within the 10m range, since sending one ranged message is "cheaper" than sending up to six messages to every one of the participant. The HUD entering the range will not automatically refresh until the next command is sent.
Target Several
For sending commands to several Apollos, owned by several avatars simultaneously, one has to attach a corresponding amount of HUDs (preferably, [Light HUD], several copies made inside the inventory while it is detached will suffice) and then designate each of them to Target... different avatars. Move the HUDs accordingly around the screen, or attach to different corners. One HUD can only target one avatar at a time, but the owner can switch between the targets at any given moment, including restoring the target back to controlling their own Apollo by clicking [ Target Me ].
Regular HUD vs Light HUD
Your partner can remotely send commands to your Apollo by either regular HUD or [Light HUD]. Regular HUD, however, is only available when purchasing Apollo. The [Light HUD], on the other hand, can be sent to a nearby avatar using the Invite... button, which essentially sends a link to the other avatar to give them a choice whether to receive the HUD or not. The [Light HUD] is free, but has no settings functionality.
Don't forget to allow
To be able to actually pass commands to someone's Apollo, the other side has to give permissions, using their Allowed... submenu.
For convenience, when dealing with the devices, sending commands to the Aeros creations, a notification about the first attempt to pass a command by a device to your Apollo will be printed out to your Nearby Chat, allowing you to either give access right away or decline it, using chat links. If Allow is chosen, and all the slots are occupied, a warning will be issued, telling that you have to manually edit the slots, with another link printed leading exactly to that portion of the dialog. The devices recently attempting to pass commands will reside under [ Recent... ] submenu, to simplify the process of selection.
You can as well use the [UUID...] for avatars and devices, where allowed. To get an UUID of a rezzed or a worn prim into your clipboard, right click > Edit it and choose [Copy Keys] button.
Silent ignoring when no permission
You have to communicate directly with other people in order to get both the [Target...] and [Allowed...] things match each other.
While devices' attempts to send commands to Apollo get notifications printed, it's different with the avatars. The reason why is that devices have no other choice, other than auto-notify of their capability.
When it comes to avatars though, we send no notifications to any of the participants whatsoever, except of the [Invite...] link to grab a copy of the [Light HUD], which we are hoping will not be used for spamming. Direct attempts to manipulate someone's Apollo via any of the HUDs without permission will be silently dismissed and won't even be registered under the [ Recent... ] submenu.
Level of control
As of [7c Beta], there is no way to fine-tune which of the type of settings are allowed and which are not to affect your Apollo. We are working to bring this feature in the upcoming updates.
Quick disallow
The menu gives you the ability to temporarily turn off and on any of the allowed avatars / devices, implementing the checkbox functionality, which will be the mode of editing the list by default. The [ Edit / Toggle ] switch will flip between the two modes. The [ All ☐ ] toggle button has a shortcut at the root menu called [ Disable All ] to quickly turn off all allowees, while keeping the list itself intact. There is also a [ Free Up All ] button available in the Edit mode which deletes all the entries from their slots.
Prevention of the notification flood
Please note, that as soon as a message regarding the first attempt to pass commands is issued, it will not appear again and again, until the next time the HUD is rezzed, which includes relogging. This way we prevent notifications from flowing endlessly during one session, and allow recent devices to populate the list of recent queries from scratch "when the next day begins".
Items worn by you automatically have full control
If you wear a prim that sends commands to your Apollo via Aeros API (it has the Aeros API script inside for this matter), there is no way to prevent the device from successfully passing the commands, and you don't need to mention it among the "Allowed...". Simply detach if you don't trust it.
Re-issue commands that hit the disallowed wall
The commands are not automatically stored anywhere for re-sending once the permission is given. Most of the time the commands will have to be re-issued manually by either an avatar or device. For example:
- The [Light HUD] targeting another avatar will initially reflect the targeted owner's state, as soon as the permission is given, prompting to make the desired changes again.
- An AVsitter-enabled animation selection has to be clicked again to pass the command to apply auto-angle, after giving permissions.
[ Allowed... ] is always for the owner
The HUD can target someone's Apollo, however, editing of the [ Allowed... ] will never affect the other persons' allowed list. It's only possible to edit your own allowed avatars and devices. The synchronization of the allowed list between several HUDs will happen automatically and override previously worn HUD's list with the one from the most recently worn HUD. Again, the latest worn HUD will beat the previously worn HUD (and overwrite all the other settings, including keyframe data, if the lately worn HUD is a regular HUD). So if you messed with the sequence, you will have to edit the Allowed list once again.
The editing of the [Allowed...] list while several HUDs are worn is completely fine, the recent edition will be instantly transferred to all the worn HUDs.
Use blue dialogs and hide them
Keep in mind, that the Second Life's blue dialogs are designed to be acted quickly and hidden. They are usually coded to stop reacting after some timeout, although it might look as if they are still active on the screen. When showing data that is prone to updates behind the scenes, the dialogs usually don't auto-update, because it's impossible to track whether the user has hid the menu or not, and the side effect of the attempts to refresh the dialog is that it pops up, possibly causing user's irritation. An example of this is the [ Allowed... ] list. If you click [ Allow ] in the Nearby Chat, it won't be reflected in the blue menu that has been shown earlier and still visible in your viewer. To refresh, navigate [BACK] from the blue menu and re-enter the submenu to refresh. There also could be convenient buttons like [Rescan] or [Refresh] that hint you about the possibility of a stale data. Re-summoning of the menu will usually result in the most fresh data shown.
- Quick Links To:
[09]
Balls Resize
Female Shapes
Seems to be unsupported. Work in progress. Acknowledged Bugs / Missing Features
Male Shapes
To resize your Balls, please Right click your whole avatar, choose Appearance > Edit Shape. Go to "Legs" section and scroll down to the Package slider. Adjust it a little and save the shape. You will be prompted to save the shape and usually you will end up having a version of the shape file with different suffixes.
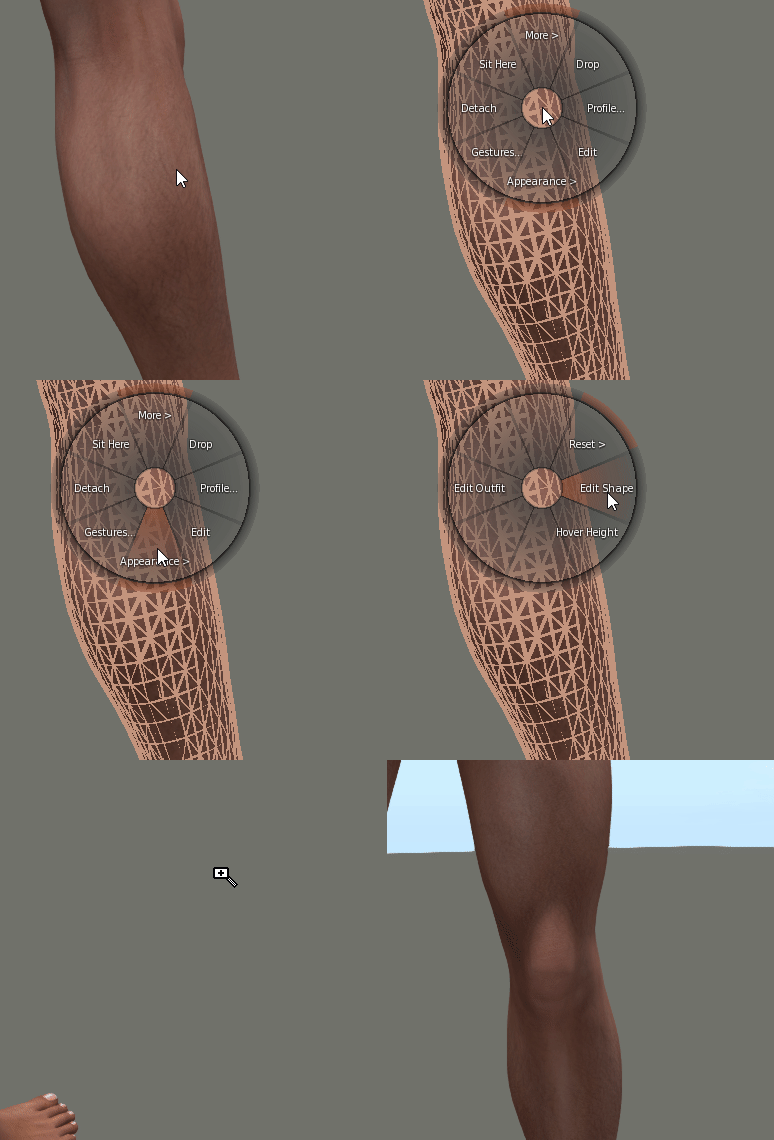
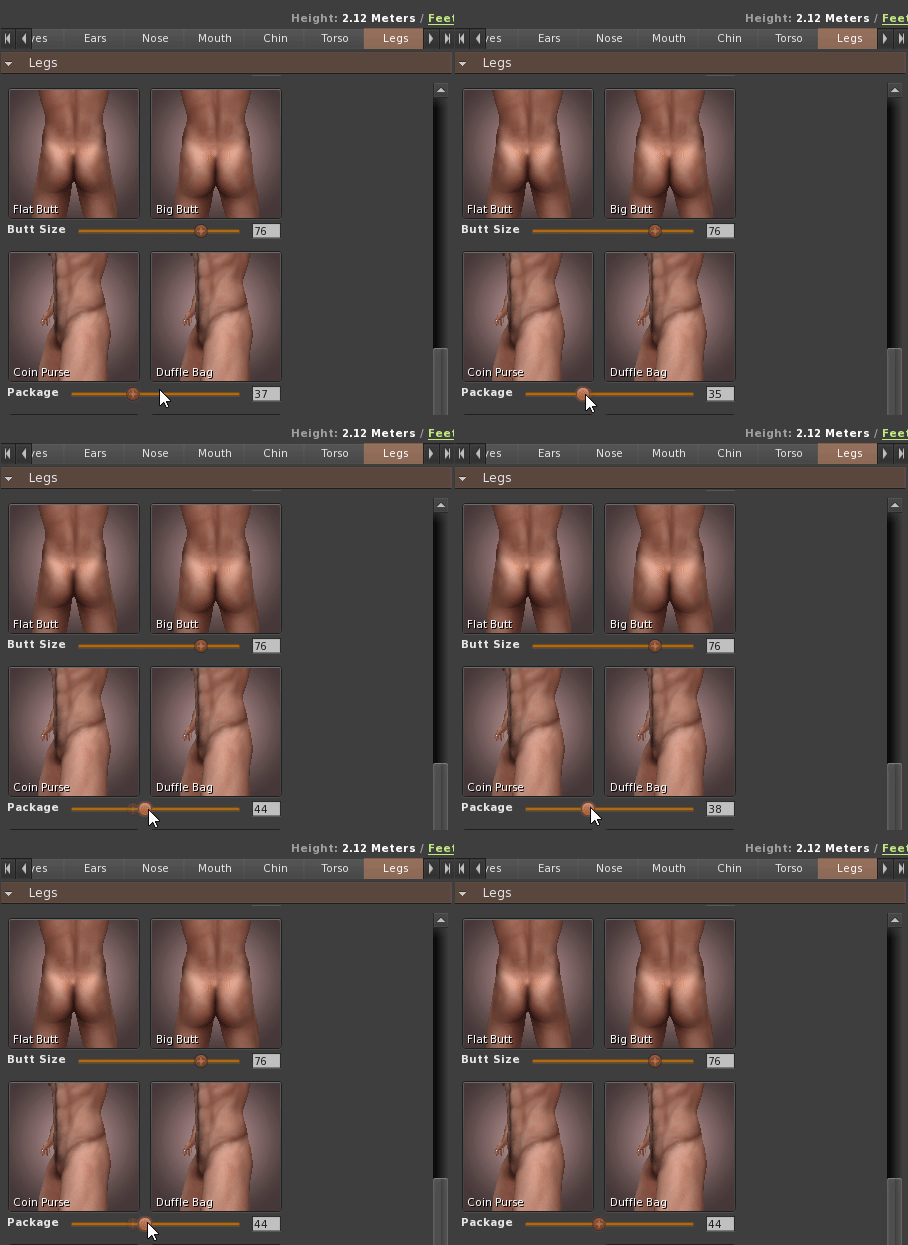
Note: While it might be not user friendly, there is no other way to adjust the sizes in rigged meshes where no movement of the bones is involved.
Note: To move the balls up / down / forward / backward use Adjust Position window. Make only balls selected and use the arrows for navigation.
- Quick Links To:
[10]
Adjust Position
In order to adjust position of your rigged Apollo in relation to your body, use the Adjust Position window. Click icon under Proportions tab of the Settings. By default all three parts are selected. Click the parts to select / deselect. Use arrows to move selected parts up-down, forward-backward.
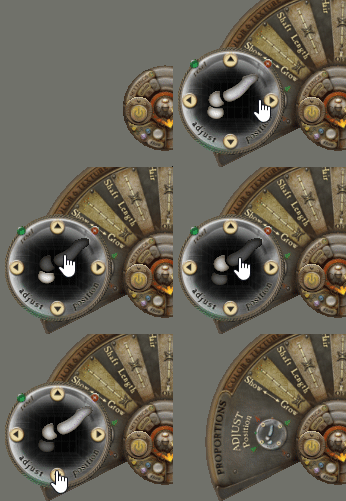
You might not be able to move all pieces together when at least one of them reaches the limit. Try to deselect some pieces and repeat. Let Aeros creators know, if you need even more adjustment available. We will address the issue in upcoming updates.
- Quick Links To:
[11]
Show - Grow
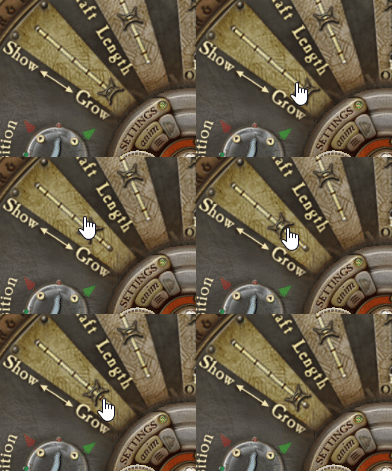
Show - Grow slider determines overall behavior of your cock. ‘Show’ keeps you big when flaccid, ‘Grow’ starts small, but grows significantly when erect.
- Quick Links To:
[11a]
Browsers
Browsers for selecting textures, animations and colors will popup when activated from different locations around the HUD.
Modify Texture
Start by clicking Entire Skin's Texture & Color thumbnails to select base texture and tinting color.
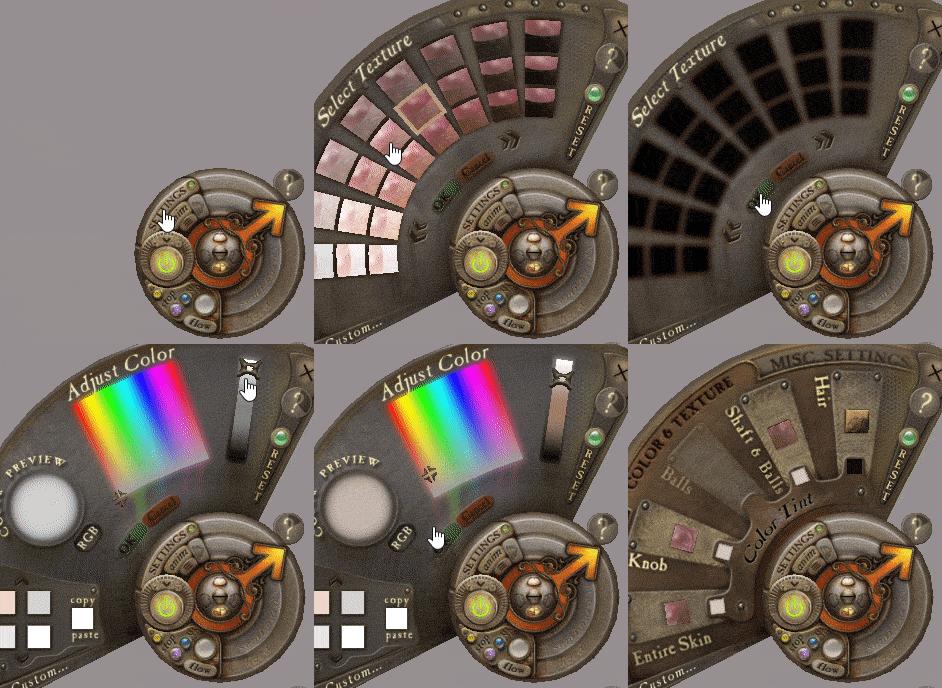
Starting with version [7b Beta], texture browser shows three tabs (for skin selection):
- Diffuse - texture map that is defining colors of pixels.
- Normal - texture map that defines additional bumpiness.
- Specular - texture map containing information on the light reflection areas.
To switch any or both Normal and Specular maps, select corresponding "stop" icon.
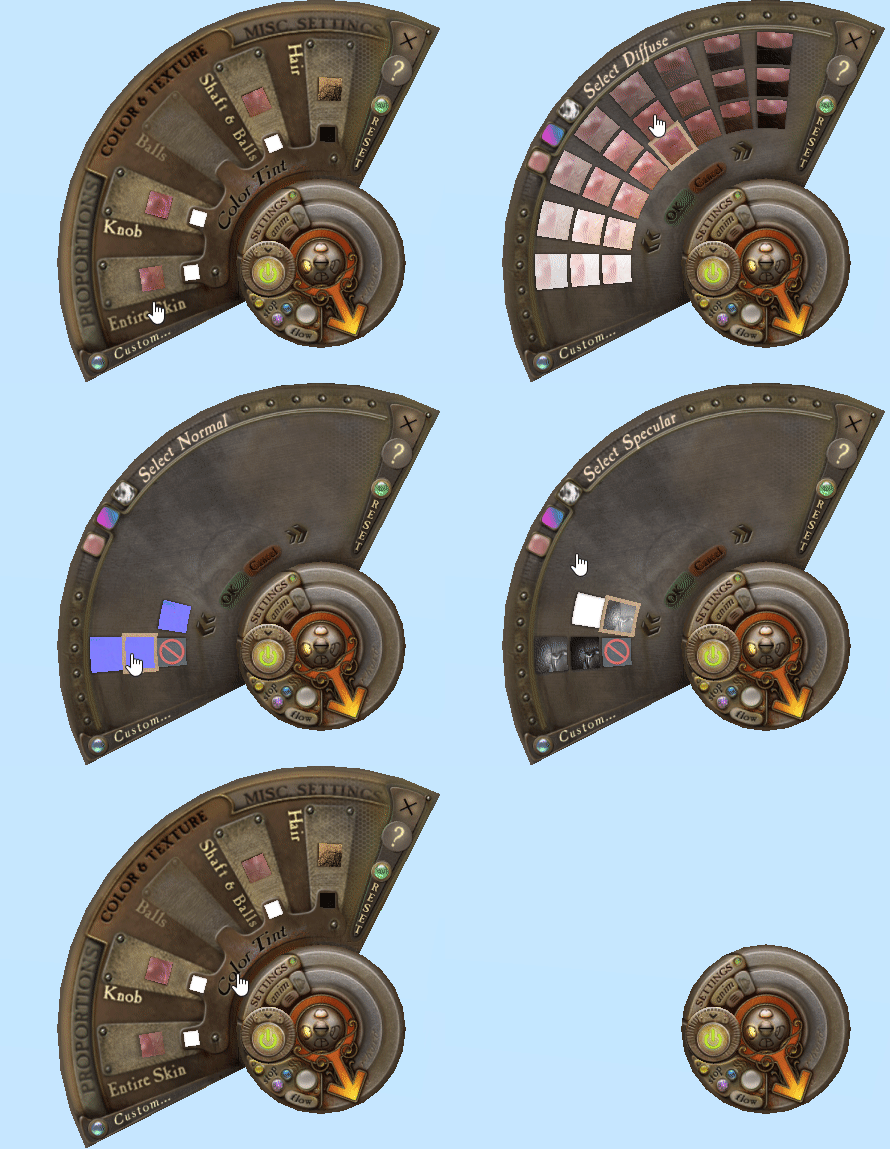
Note: The effects of the Normal and Specular maps can only be visible if "[X] Advanced Lighting Model" is switched on in the Viewer Preferences > Graphics. For all extra modifications, including custom maps, rotation, scales, offsets as well as specular parameters, please use Injection HUD.
The same kind of texture browser will appear when selecting textures for liquids in the Flow mini-window.
Adjust Color
Tinting underlying texture
This method is a regular tinting of an underlying texture, similar to color choice in the Edit window of the Second Life viewers. With the texture that is close to the one you desire, or slightly lighter, you then tint it with a little bit of color to achieve the final (or target) color.
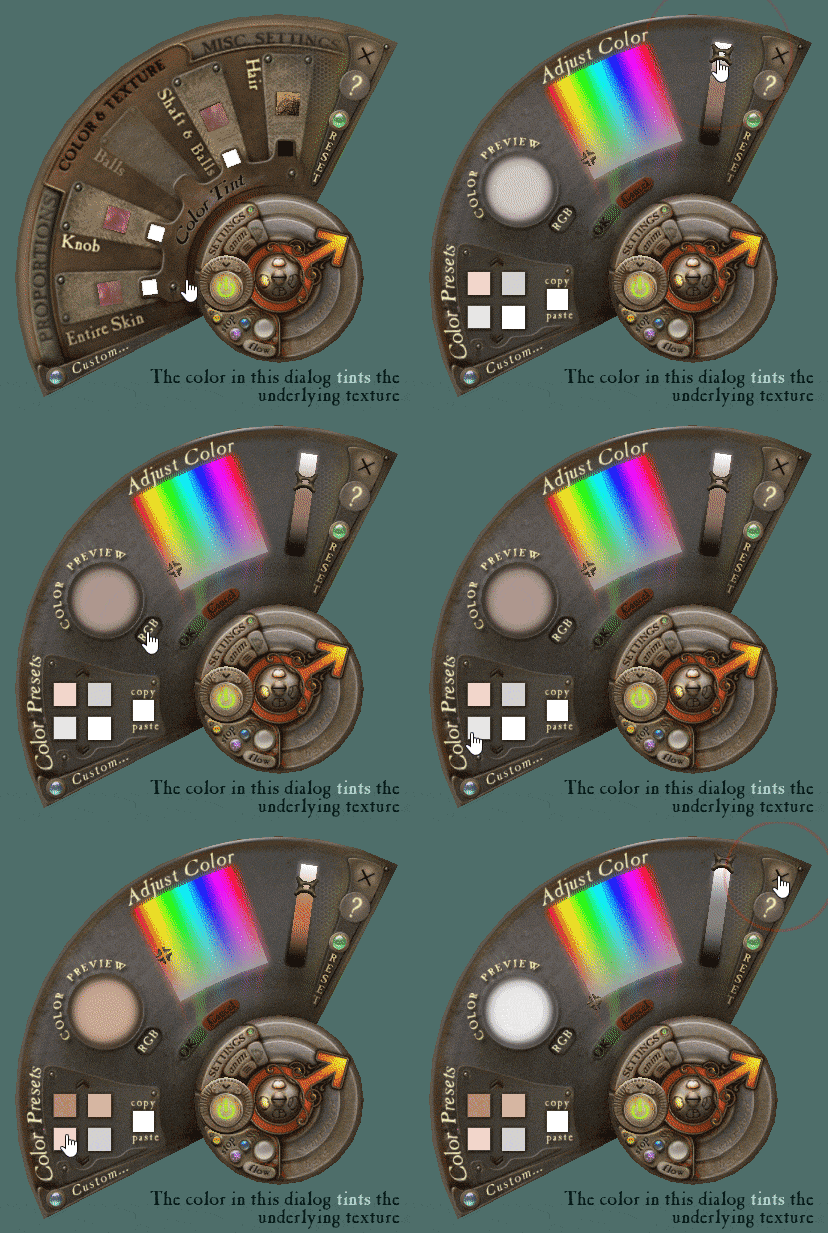
Print & Enter Tinting RGB
- In the Adjust Color window, click "COLOR PREVIEW" circle to print out the RGB of the current tinting color.
- Click the "RGB" button below the disc to specify the tinting RGB using numbers in various formats.
Keep in mind, that the RGB you are providing is not the final RGB you are gonna experience. It is rather a tinting color that adjusts the underlying texture.
[11b]
Target Color - Color Match HUD
Some users are finding it hard to eyeball the final color by the method described above.
While not 100% accurate, the method of calculating the combinations of textures & tinting RGB can be very useful. Since the calculations are script-heavy, and might require instant modifications, the tool is available as a temp-attach HUD, that could be requested any time from the Aeros Island. The HUD is called Color Match HUD.
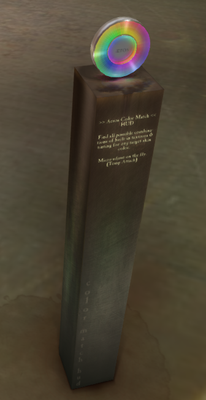
The HUD is expecting a target color, which can be your final skin color, if you know it. Or it could be read using the color picker tool from your skin while setting the Windlight Sky to CalWL and turning on Developer > Show Info > Show Color Under Cursor option. You can as well take a screenshot of your skin and color pick RGB with any editor.
Inside the HUD, the color can be specified using the color wheel, RGB or HSL numbers, and provides the buttons for adjusting the color. The HUD is then calculating the texture / tinting combinations for all available models to achieve the target color.
If your cock is worn, the name of the model will be highlighted and the circles representing all found combinations might be clicked for immediate injection of the found combination right into the cock.
100% white will find no combinations. The darker the skin, the more combinations will be available.
The bigger the circle among the options found, the less tinting is used to achieve the final color, and that means less details are going to be lost. Smaller circles may very often give better results though, in case the skin is less veined, and losing of the details is desired.
Keep adjusting the final color to find the best combination. The menu gives in option of [X] Auto Applying. Useful for many iterations of slight modifications.
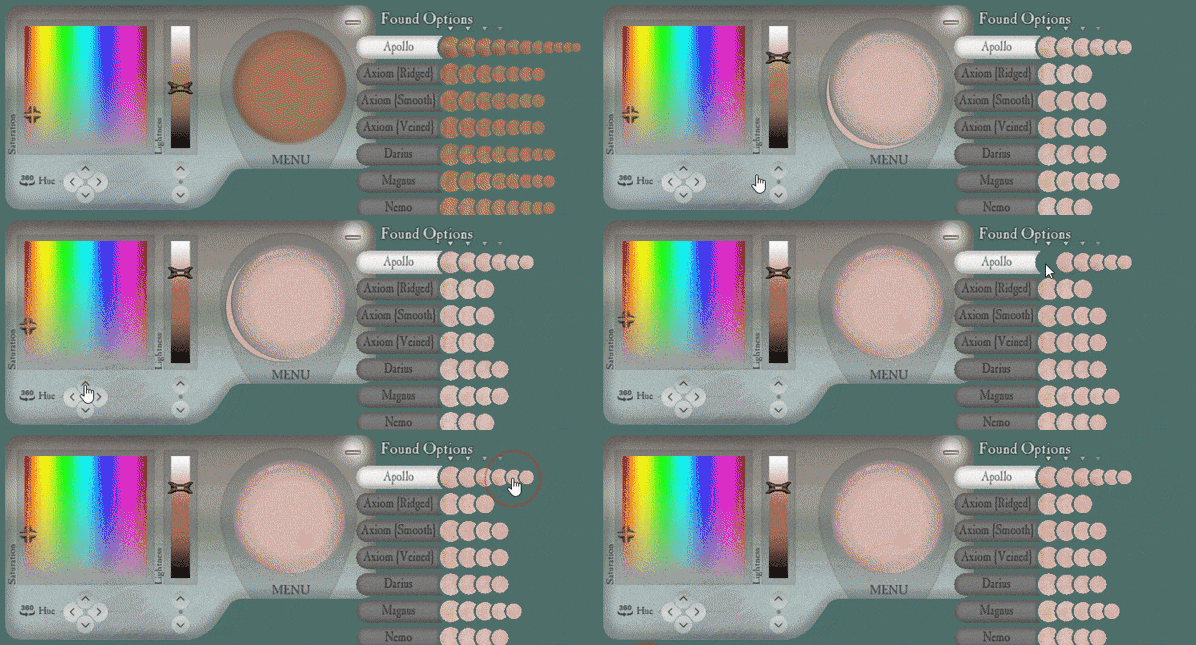
The HUD supports all [6.x] models as well as Apollo since [7c Beta].
Animations Browser
Animations browser is similar to texture selection browser and lets you choose animation for the Animation Player Window. Follow this link for details.
- Quick Links To:
[12]
Injection HUD
Injection HUD is a separate HUD that allows for all kinds of adjustments to be made to all available layers of the cock.
Why Not Make Device Mod?
- First challenge is to select proper meshes aimed for modification on a rigged attachment. Unfortunately it's not quite easy to correctly select proper meshes and not to mess up (for example, 15 of them stand for all kinds of versions of the shaft and balls). Not to mention that you need to select proper faces! The viewer's Edit Window is simply not geared up for that. On the other hand, Injection HUD reveals just three slots, combining different versions of shafts into categories. It also only lists one slot for knob, although we have several meshes for it internally. The same for other layers. The HUD lets you shift-click the squares representing meshes and perform modifications, rather than fiddle with the blended together meshes.
- There is quite a lot in terms of scripting to allow modifications, to specify parameters which shouldn't be overridden, saving & loading to a remote server stuff and the User Interface itself. Most of that logic has been moved to the Injection HUD instead of keeping it in the HUD or the cock itself. So once you detach Injection HUD you get rid of many unnecessary for day-to-day use scripts.
- A modifiable device would allow folks to put arbitrary scripts inside our creation, possibly crack our server communication, break into something that we consider vital for the privacy of our customers, and pretend that this was done by us, which we don't want to happen. As a result, it's copy-only. No exceptions.
Usage
Wear it.
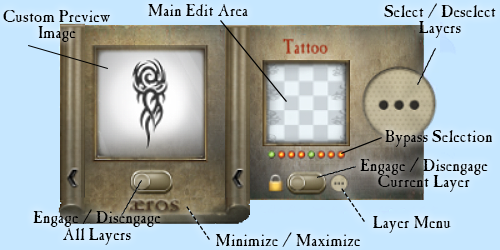
Ignore the central square for now, just notice the slide underneath which lets you "engage"/"disengage" the whole set of selected slots.
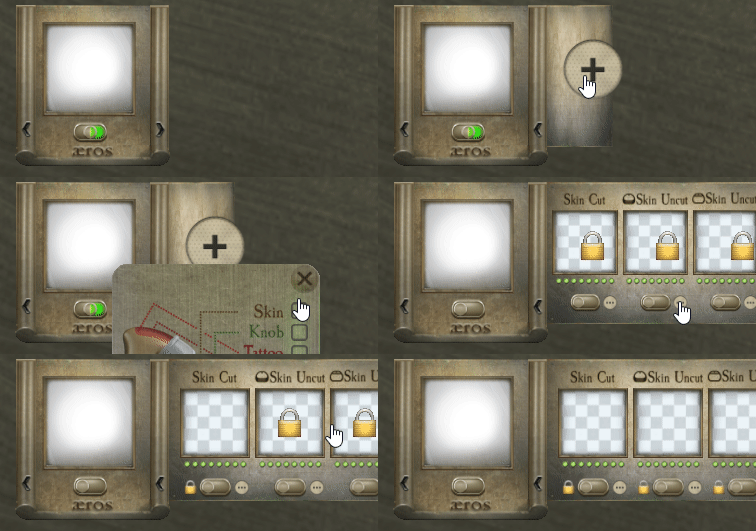
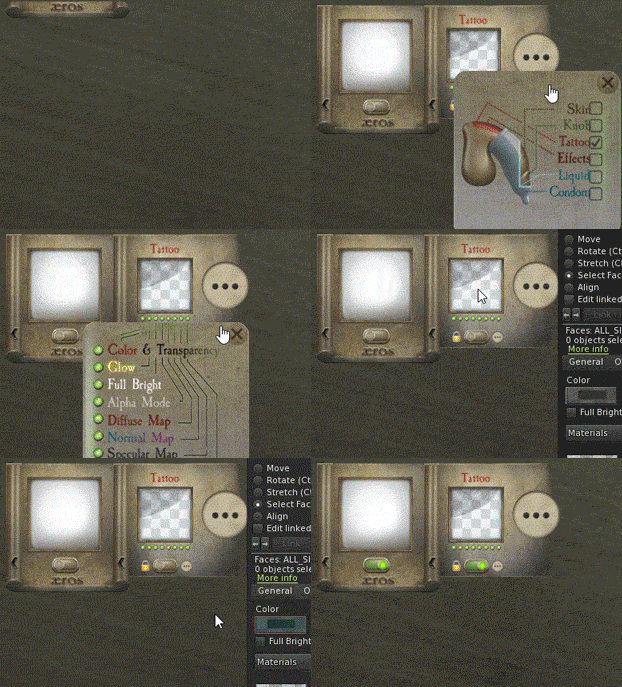
To choose one or several slots, click (...) or (+) button to the right of the central square and place checkboxes to the layer(s) you want to adjust. Close the popup and the areas corresponding to your selection will show.
Unlock an area that is covered with the padlock icon by clicking on it if you want to edit some parameters of that slot.
Clicking on unlocked area will popup a blue menu (also always accessible via (...) button below each slot). The menu explains the basics and lets you do stuff like "Cock Reset" for individual slots.
Bypassing ("Bypassing Bulbs")
There are scenarios in which the desired modifications are only little, like making an already existing specular map more shiny or apply some tinting to the cum layer.
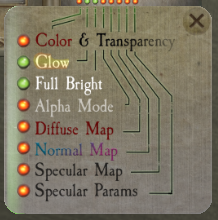
To achieve that, click the green/red Bypassing Bulbs right below the main edit square and specify in the popup window which groups of parameters you want to pass and which to bypass. Red bulb means bypass (stop!), meaning you don't want to overwrite any previously applied, existing behavior, for this group of parameters.
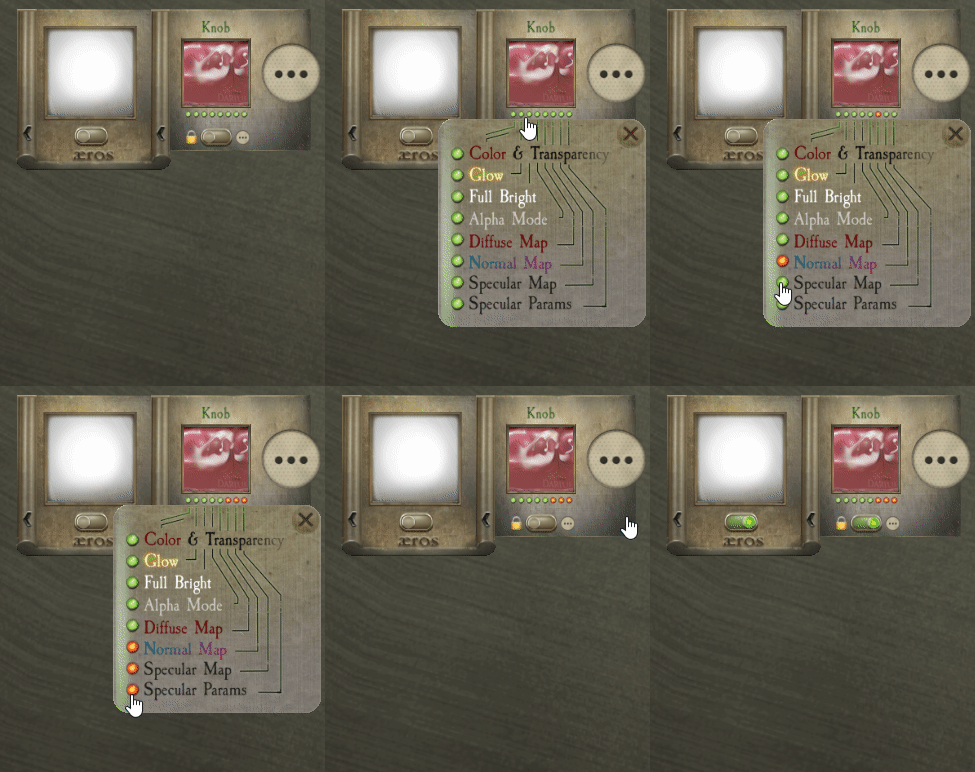
-
Example: In the screenshot below, only Glow and Full Bright are selected for sending and overwriting the layer's parameters:
Note:
- Legacy Bumpiness & Shininess are bypassed unless you make two bulbs green, marked with the corresponding right-side label (since [7b Beta]).
- Legacy Bumpiness & Shininess may act up when combined with Specular and Normal maps. Click the slot > [RESET] in case you notice that they don't want to cooperate.
- Don't forget that normal and specular maps can't be "seen" in the Injection HUD itself, and in order to be seen on the in-world objects, Graphics should enable [X] Advanced Lighting Model and you should rotate the lights or play with the sun location.
Edit and Adjust
You need to be familiar with the ordinary Viewer's Building Tools to be able to modify the layers.
The HUD consists of many prims, but your aim is to only select the square Main Edit Area of a slot which you want to perform your adjustments, that is located right underneath the slot label and above the Bypassing Bulbs.
To perform this:
- Unlock the slot's main edit area if it is "locked" (padlock icon should not be over it).
- Select Build > Select Build Tool > Edit Tool (shortcut is usually
Ctrl+3). - Now in the Edit Tool window, switch to Select Face (or "Select Texture" in some viewers).
-
Finally, click the unlocked square area below the label and above Bypassing Bulbs of the desired slot.
-
Now you can simply adjust that layer using Edit Tool window, as you would do with any other prim and that includes all the tabs and all the fields that are found there.
-
To start passing parameters you've modified, close the Edit Tool and click the Engage switch that is right below Bypassing Bulbs. (From now on, the changes will be auto-sent, if you go back to Edit Tool of the slot and apply new changes until you designate the slot).
-
If you see no change:
- Check the Engage switch - it should be green.
- Check the Bypassing Bulbs. The chances are, a red bulb is preventing the change from happening.
- Check the cock's state:
- If you are modifying the shaft & balls layer, there will be three slots, so, make sure your HUD's foreskin selection is in the corresponding to the edited slot state. You can shift-select all three slots as well to synchronize modifications.
- Similarly, if you are modifying the condom's layer, you can't see anything until you put it on.
- If you are editing liquid, cum into the condom.
Texture Params
You can scale, rotate, flip the textures. All these parameters can be passed to the corresponding slots of the cock.
Reset & RESEND
Modifications that the Injection HUD does are additive due to the bypassing feature. So, depending on what has been passed to the layers earlier, and which values have been bypassed in each step, you might end up with different results if you try to repeat the process. One way to ensure the slots do what's expected is to choose "Cock Reset" from the slot's blue menu to bring the desired slot back to its factory defaults. After resetting, click the slot (or (...) button) for a blue menu and select RESEND to force parameters to be sent. The slot should be engaged for RESEND to actually work. (You can also Disengage and Engage the slot to force it to resend).
If after resetting, and giving it some time, the cock continues looking like a checker box, here's why and how to change that. The Main HUD is marking all the diffuse textures as "custom" (represented with checker board thumbnails) when diffuse textures are modified by the Injection HUD, to prevent from reversal overwriting, so you might want to go back to the Main HUD's settings and re-apply them to make it look as usual.
Examples
-
Example: You only want to adjust the amount of specular effect and not to change the map itself, as it has been applied earlier or you want to keep default one. Make every bulb red except "Specular Params" and edit specular parameters.
-
Example: You only want to add full bright & glow. Make it the only green bulb. Now edit full bright on the slot's face.
-
Example: You want to modify Alpha Mode to Alpha Masking, but not the Diffuse Map. Select Alpha Mode only. Modify it on the slot. You might need a different texture to select needed alpha mode. Don't worry, texture itself won't be passed if your Diffuse Map bulb is red. Keep in mind, that alpha masking will not work if existing on prim texture has no alpha data.
Big Central Square
The big central square is for assigning a custom texture that will help you to recall what your settings are all about. It doesn't affect anything, it is only a preview that will be saved along with all the rest of the data when you Save... to a remove server. It will also become visible in the browser on the left side of Injection HUD if you decide to use it for keeping shortcuts. Drop any texture into this big square. Any other modifications made to this slot will be lost.
Browser
Use the left part of the Injection HUD to keep shortcuts to your settings on a grid. It is not an essential part of the process, being only designed to keep shortcuts of your saved parameters. The only tip is: clicking any of the assigned shortcuts will case the settings to be loaded from the server and they will overwrite everything that has been done to any slots, that's why save your work before clicking anything in the browser.
Texture Maps
Please navigate to Texture Maps page to download the files for Apollo.
Reset All
If you need to start from scratch: Click big central square, and choose "Cock Reset All" from the menu. Then go to your Main HUD and select texture & tinting one more time (or click "Reset" at the Color & Texture tab).
Each slot can also be clicked for a "Cock Reset" button that only affects one chosen slot.
Resend All
Whenever you need to force the settings to be sent once again simply click big central square and choose "RESEND ALL". All currently engaged slots will send their settings.
Each slot can also be clicked for "RESEND" button that only sends data for one chosen slot. The slot should be engaged for RESEND to work.
Save & Load
Click big central square, and choose "Load/Save..." button from which you can save & load your data to our remote server. Data sent is encrypted and decrypted back only when it reaches the script after receiving it back. This data will survive future version updates. If you create a shortcut on the left side, then clicking shortcuts is initiating loading back from the remote server.
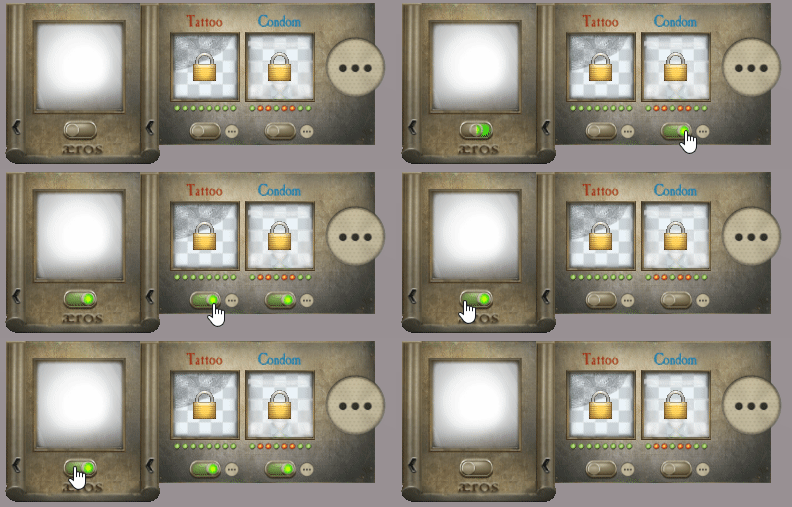
Engage / Disengage
To prevent accidental injections, most of the time we will bring up a new slot being disengaged. Simply engage the slot(s) you need to affect the cock or use the main switch (which also indicates partial engagement).
Accidental HUD Modifications
Providing the Undo/Redo functionally would be quite a task for a scripted Second Life device, so instead we made a simple to grasp locking functionality that prevents the slots from accidental modifications in the HUD.
This differs from bypassing or disengaging that are designed to prevent the data from reaching the cock itself.
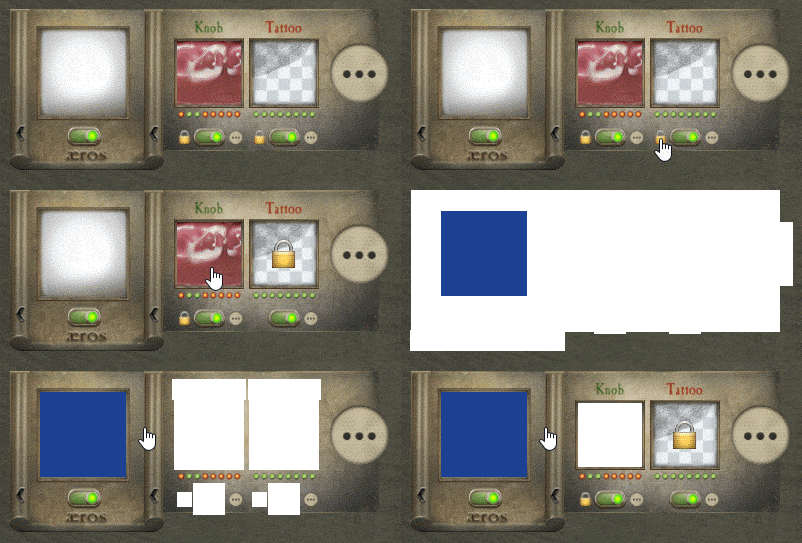
As you will notice, every slot is locked by default, which is represented by the padlocks over the main edit areas. Moreover, slots are auto-locked upon every HUD attachment, relog, and every loading from the server as well.
In other cases you might want to lock the unlocked slot by clicking a padlock mini-icon as soon as you are done with it.
Locked slots are simply preventing accidental HUD modifications. How so?
Being modifiable, the HUD can be completely "ruined" by an accidental change of the whole prim or a wrong face selection, thanks to a limited permission system in Second Life. To overcome this problem, the HUD is programmed to restore itself each 15-20 seconds, which includes restoration of all the locked slots.
Watch the following "Tattoo" slot restored back after accidental HUD change, but not the "Knob" slot:
Examples
Watch the examples of usage:
Local Textures / BoM Textures
Use local to viewer textures to avoid upload costs or BoM textures if you like to experiment with that. Make sure your final texture is uploaded and visible to others. Usually relogging reveals obsolete local textures making them solid grey.
For other products out in the market, allowing custom UUIDs but having no similar to Injection HUD local texture injection capability, consider Second Life Beta grid or our universal Local Texture UUID Reader Tool HUD (saves you money after the 10th upload).
- Quick Links To:
[13]
Disintegrator
Mysterious feature that will remain mostly unexplained. Try to play with it (at your own risk) if you want to adjust the way Apollo behaves when you change its angle / level of hardness. Reset button will save you.
- Hint: Don't create too many keyframes with the (+) button. The script since [7b Beta] won't let you to crash it. Locate unnecessary keyframes by moving to them with the (^) (v) buttons. Click (trash bin) to delete unnecessary keyframes.
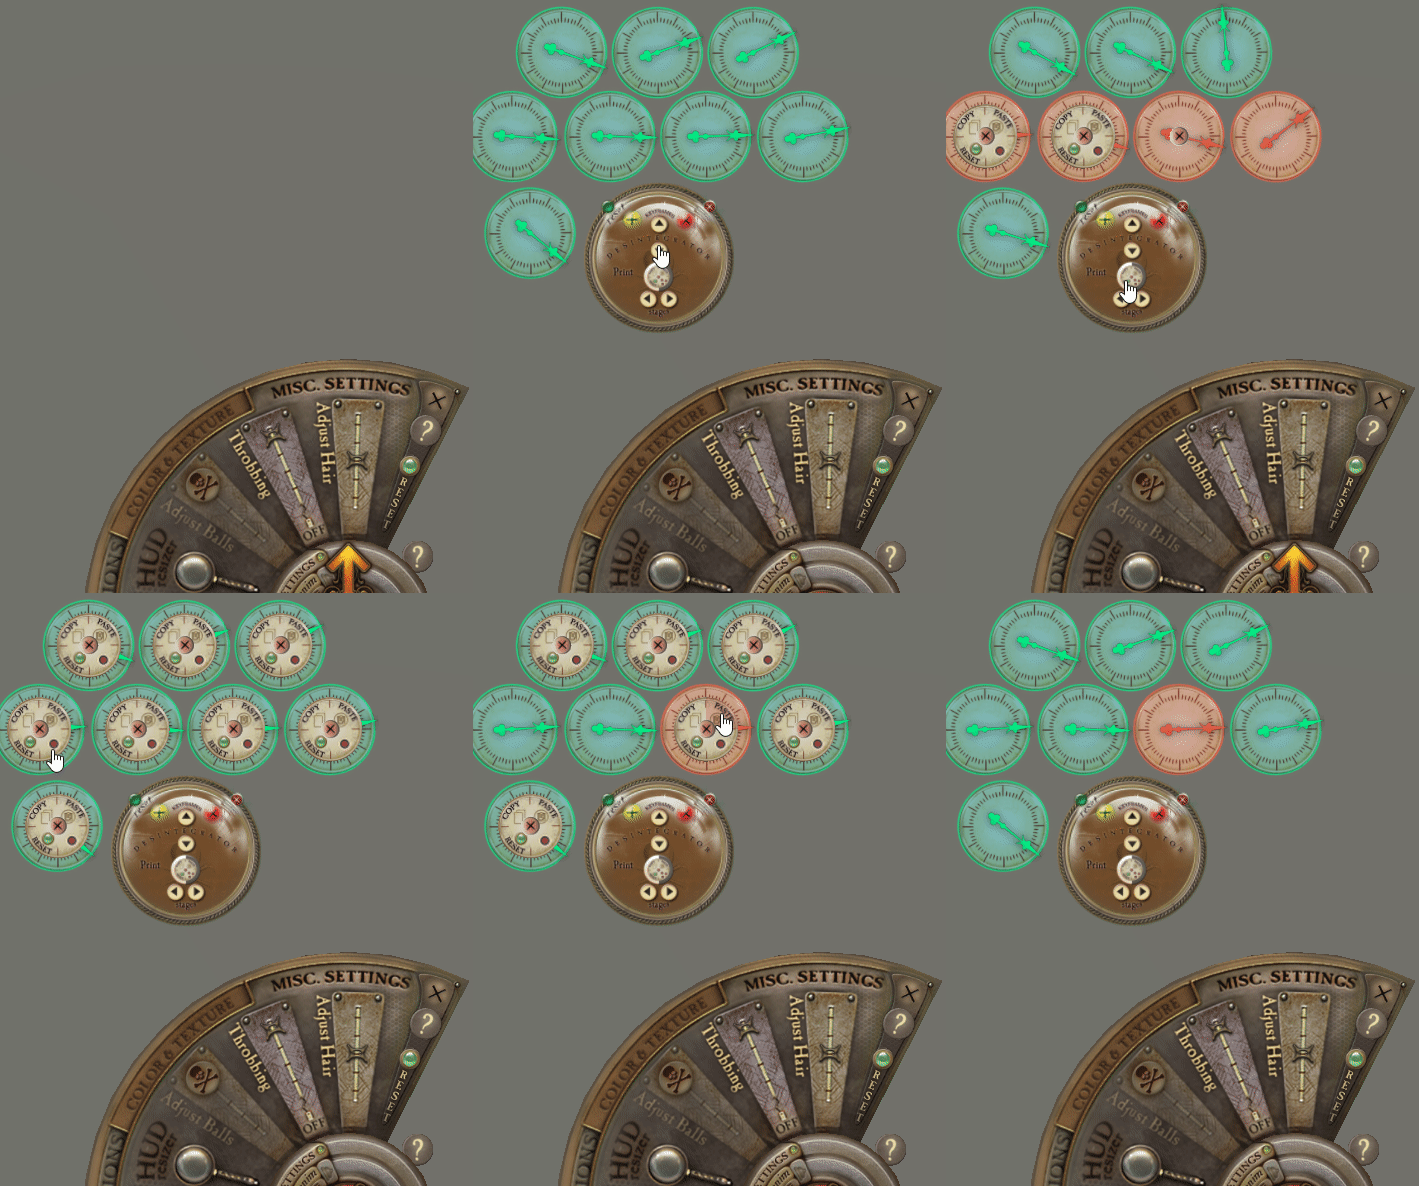
 Aeros Apollo Disintegrator (Keyframes Editor) Workflow
- Quick Links To:
Developer Kits
Textures
Animations
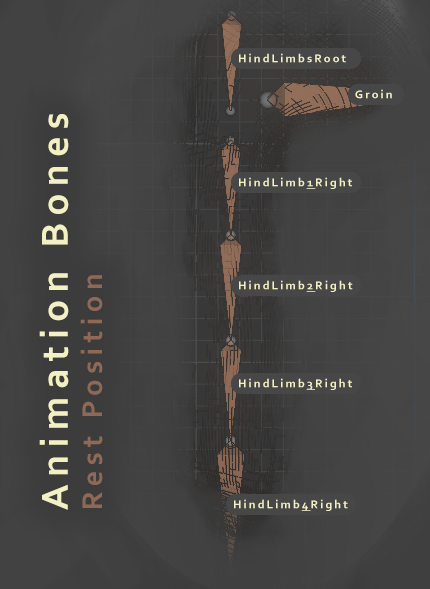
We understand that some developers might want to animate the bones that Apollo is rigged to. We can't provide the meshes, but we can illustrate the way Apollo is rigged, which you can also observe using the Developer menu in the viewer. Please make sure to upload your animations with the priority 6, as the bones themselves are animated with priority 5 to fight the Animation Overriders. Here's a schematic illustration of the bone rig:
WARNING Text in this wiki may contain adult-only terms and expressions. Video links are properly marked as adult-only as well.
- Aeros :: Common FAQ
- Aeros :: Aeros Avatars FAQ
- Aeros :: Aeros Avatars Appliers and Extras FAQ
- Aeros :: Aeros Male Attachments FAQ
- Aeros :: Aeros Apollo
current page - Aeros :: Aeros News
Updated
